Version control with git
Content
Version control goals
A reasonable software quality can be maintained by relying on two things:
-
version control
and
- test driven development.
A well tested code is likely to be properly organized (modular), in whatever programming model:
- structured,
- object oriented or
- functional.
Modular code is a standard best practice and helps people to work on different parts of code (simultaneously). It is easily paired with version control, that helps to maintain an oversight over different working stati on different modules.
Version Control helps to prevent the duplication of files, by tracking if changes (differences) exist between them in different commits . It also helps keeping an overview over different versions. Version control systems make it possible to have a single set of files (raw text, LaTex, fortran/C++/python/BASH source code) and switch between different versions (so called branches ) using a version control system (VCS). A popular example is git .
Thus VCS will enbable you to have one folder and when you switch branches it will remove, modify or add the files according to the state of the branch you are checking out. This also has the advantage to potentially save a lot of storage on your computer, since you do not have to have dozends or even hundreds of folders/files on your computer, manually sorting them.
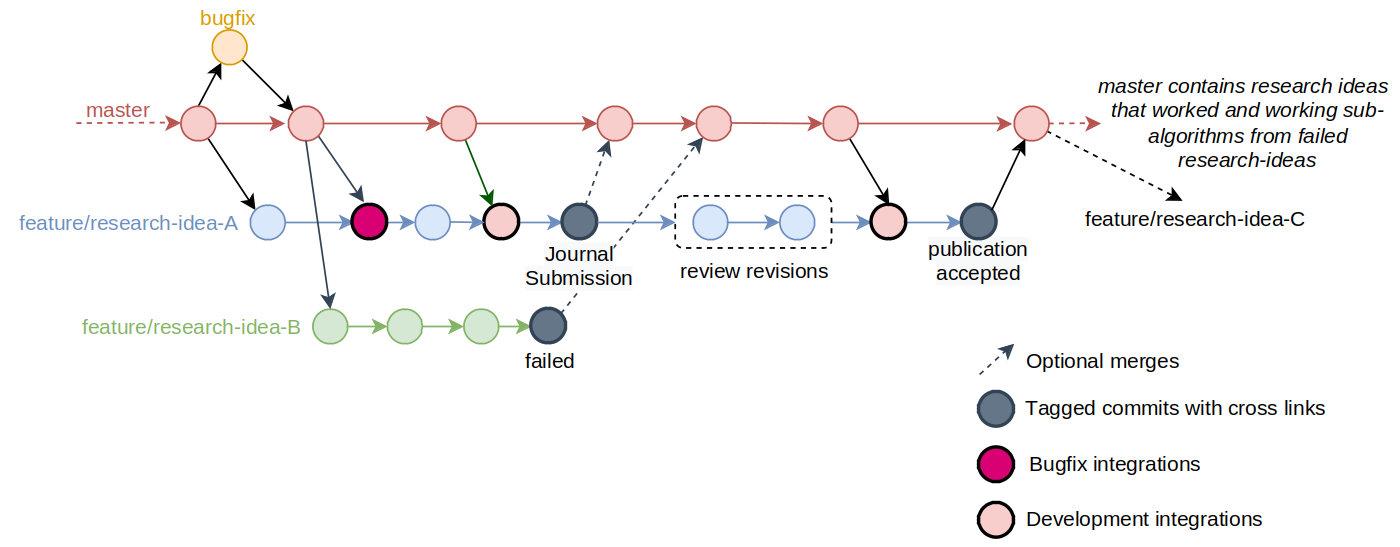
Example for an workflow with one ‘master’ and one ‘feature’ branch. Time goes from left to right. Commits are visualized in yellow, branches in blue and red.
A VCS enables traceability of every step (commit) of your files. You can go back to previous versions of your code at anytime and you can work on different things (like modules/features in your modular code) at the same time (in different branches). Once you are satisfied with your work in one branch, you merge it with the ‘master’-branch. This means your changes will be deployed to the ‘master’-branch. In the above example the branch ‘feature’ is merged with ‘master’ at in the last commit (the one on the very right).
The version control system that is widely used and adopted here is the git version control system. It is available on all operating systems, it is open source, and distributed. The distributed nature of git makes it possible to work without the connection to a remote repository (abbr. repo), and easily push the updates once the connection is established again.
Version control
The principle is to have one main git repository into which contributions are continuously integrated from different researchers. Branches should be ‘master’ and the ‘feature’-branches only, refer to the next section. Tags are used for milestones and papers.
The main repository should be on a server, that is accessible to all researchers involved at all times. It should not be someone’s personal laptop but a GitLab/GitHub server. These provide not only an interface to work on your repository but also for tracking issues, review code development and code changes. Also we use the continuous integration feature provided by GitLab.
Every researcher can have a repository with a clone of the main repository on his local computer ( a local repo ), where he can work on the code. Every noteworthy increment should get a commit and every commit can be pushed to the server.
A simple workflow
Most of the work with git can be done using this simple git workflow:
- Create a ‘feature’ branch (a version) starting from ‘master’.
Call it ‘feature/research-idea’ or a bit shorter ‘feat/research-idea’.
A convenient way to create the ‘feature’ branch linking GitLab issues, ‘feature’ branch and merge request is described here. Give the merge request such a name:Draft: <Description of the MR>orWIP: <Description of the MR>. - Work on it, test it, refactor the code.
Regularly integrate updates from the ‘master’ branch.
Run your tests and all other tests to make sure nothing is broken there. Clean up possible conflicts the best you can. - Git tag and cross-link your code once you are satisfied.
This usually happens when you reach a milestone and/or submit a paper and your code to a journal. - Update the ‘feature’-branch according to reviewer feedback and new commits on ‘master’.
- Submit a merge request once the publication got accepted or remove the
Draft:/WIP:tag from the existing one.
If there were new commits git tag and cross-link the latest version. - Run all tests or rather: your CI runs all the tests.
- Merge the ‘feature’ branch into ‘master’.
- Optional: Once your merge request has been processed with your colleague / git manager, you can clean up the ‘feature’ branches from your repos, local and remote.
Branch naming and organization should be done using the feature branching workflow:
- master: everything here compiles , every test here runs.
- feature/parallelization: you are working on parallelization here, and nothing else.
- feature/second-order: you are working on second-order convergence here, nothing else.
- feature/… another feature-branch of yours
Important git commands
There are many more commands, and one can make version control arbitrarily complex with them. These commands are enough for a clean and simple workflow.
| command | Description |
|---|---|
git clone <URL> |
create a clone, a copy of the remote repository. |
git remote add <repo-nameURL> |
add a remote (e.g. an official TU Darmstadt repo, a research group repo, your private repository on a USB stick). |
git add <file> |
add the changes to the file to the next commit (a set of changes you are happy with) |
git commit -m "MESSAGE" |
commit a set of changes with a precise and short description (here ‘MESSAGE’). |
git push <repo-name> <branch-name> |
push the changes to the remote repository and a specific branch. |
git pull <repo-name> <branch-name> |
fetch the changes from the remote branch and merge them. |
git checkout -b <branch-name> |
create a new branch (a new idea). |
git checkout <branch> |
load the files from the other branch, ‘switch’ to it. |
git merge <branch> |
merge a branch (could be your feature branch) into the branch you’re currently on. |
git tag <tag-name> |
create a git tag , a read-only point in the development tree, when you publish a paper. |
Best practices
Keep things simple:
- Branch for every new idea, it only costs 46Kb of space, even if you branch of within OpenFOAM, that has 500k lines of code.
- When you are working on an idea, you are working on its branch.
You should not work on two ideas on the same branch, that’s how one exits Zen. If a change should be shared between branches, checkout the parent branch (‘master’ or another ‘feature’), apply it there, then merge in the current branch from there. - Commit often, do not put whole libraries in a single commit. Don’t create 1-commit PhD code.
- Integrate your branches with the central project repository, if there is one.
Regularly pull the latest changes from the remote to your local repository to have it up to date. Once your merge request is done, delete the ‘feature’ branch in your repo (local and online). - Create git tags, for important milestones, e.g. if a paper is finished. You could even use the DOI as the version number.
- If you are talking about rebasing history, reverting commits, undoing commits, cherry picking, and other stuff like that, you are not using enough branches and are committing too seldomly.
Smallest continuous integration frequency is determined by the frequency of published papers: at a point of a publication of a paper, all the test cases related to the paper, and the validation and verification cases reported in the paper must execute on the ‘master’ branch of the git repository of the project, without breaking any other tests.
Where to start
To start install git and get an account. Then set up or join a repository.
Of course please also refer to our literature. Or get a list of our articles assigned to this chapter via the tags on the top of every page.